
Interface details
This module allows you to complete invoices. Each operation done in the invoice module has its own color assigned to it:
- Sales will have a Green header
- Purchases; Blue
- Rentals; Purple
- Refund; Red
- Consignment; Yellow.
- Special Intake; Orange
You can adjust item quantity, add notes to items, add notes to customer’s profile, add a discount and change the sell price if needed.
If you sell more than one item of a quantity or bulk item, Alice will simply increase the quantity of each under the Quantity column and keep them on a single line. For serial type items, they will have their own row on the invoice with their unique serial number.
![]()
- Empty header: Will display the color based on the invoice type.
- Qty: Quantity of items sold for bulk and quantity item type.
- Name: Name of the items sold.
- Note: Add a note for a specific item.
This is where you’d add a specific note for an item if need be. Once a note has been added, you will see a “*”.
- N/U: Indicates if the items are new or used.
- Discount (%): This is where you’d add a discount if need be.
- Purchase: How much you are purchasing an item for.
- Sale: How much you are selling an item for.
- Required Action: …
Product information tab: This tab will show you information about the currently selected item in the invoice such as the number of items in stock, its sales price, etc.

Cross Sales tab: This tab displays previously configured Cross sale items that you can suggest to your client based on the selected item in the invoice.
Sellable Attributes tab: This tab allows you to see applicable previously configured sellable Product attributes for the selected item on the invoice.
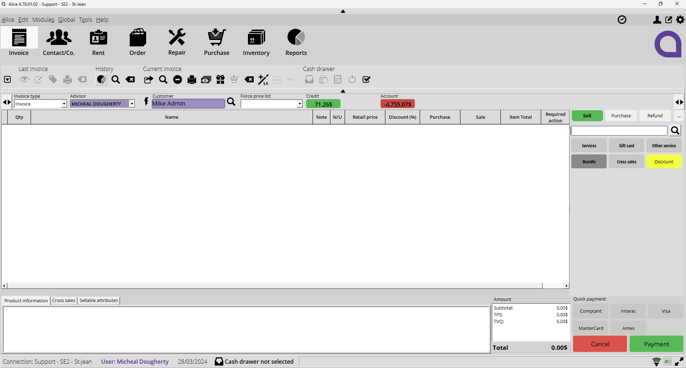
Amount Section: This section shows you your sub-total, the taxes and the total amount to be paid for the invoice.
Buttons at Top of Screen
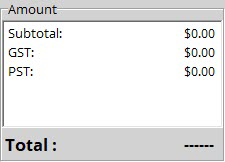
Last Invoice Section
These options only affect the last invoice you completed in Alice POS.
 |
Menu |
| Preview last invoice | |
| Edit last invoice | |
| Print last invoice labels | |
| Print last invoice | |
| Cancel previous invoice |
- Menu: The menu button is a shortcut for specific operations like View last invoice, Finalize, etc.
- Preview previous invoice: This option allows you to view the previous invoice completed.
- Edit last invoice: You can go back and edit the previous invoice completed if need be. Please note that the invoice will be canceled, but the newly generated invoice will contain the same client and item(s).
- Print last invoice labels: It is possible to print labels from items sold in the previous invoice.
- Print last invoice: You can use this button to reprint the previous invoice completed.
- Cancel previous invoice: This button allows you to quickly cancel the previous invoice completed.
If the options are greyed out it means there are no previous invoices available. This may occur because you have just started your day or because the program was shut down and reopened. Once you’ve completed an invoice the buttons will be available.
History Section
These options allow you to search and manage information quickly.
| Display available reports | |
| Search an invoice | |
| Cancel an invoice |
- Display available reports:
- Payment modes summation: Displays a list of payment method over the course of a given period.
- Invoice list: Displays a list of all your completed invoices.
- Transfer/inventory retrieval: Lists all inventory transfers that you have completed.
In the Management section, you can select a specific date or a time period to generate information for as well as selecting the clerk that was responsible for the invoices. Click on the view button to see the information or print out a copy for yourself.
- Search for invoice: You can search a specific invoice with an invoice number.
- Cancel an invoice: You can search an invoice to cancel with its number.
Current Invoice section
This section deals with the invoice you are currently working on.
| Remove the next product from the invoice | |
| Search for sold item | |
| Delete the invoice product | |
| Print invoice | |
| Cancel current invoice | |
| Deactivate mandatory sellable attribute |
- Remove the next product from the invoice: This option allows you to re-scan an item to remove it from the current invoice.
- Delete the invoice product: This option allows you to remove individual items from the invoice without having to cancel it.
- Print invoice: This will finalize and print the current invoice.
- Cancel current invoice: This will cancel the current invoice.
- Deactivate mandatory sellable attribute: This allows users to deactivate adding mandatory sellable attributes. This will also let users remove already added mandatory sellable attribute.
Cash Drawer section
| Open cash drawer | |
| Log a paid in / out | |
| Manage cash drawer | |
| Disconnect from cash drawer | |
| Select a cash drawer |
- Open cash drawer: This button allows you to open your physical cash register.
- Log a paid in / out: If you have an entry of money into the cash register that is not transaction related such as adding a roll of change or you need to take out money to make change, you can track those activities:
- Click on the « Log a paid in / out » button
- Select if it’s an in or out
- Indicate the amount
- Leave a note explaining the paid in or out
- Manage cash drawer: This allows you to manage operations, verification and the closing of your cash register. To know how to manage your cash register, click here.
- Disconnect from cash drawer: If you need to switch your cash register during the day, you can virtually disconnect yourself from it if needs be.
- Select a cash drawer: If you need to change your cash drawer during the day, click on the “Select a cash drawer” icon to select another cash drawer that has been configured in Alice POS. For a refresher on how to configure your cash drawers, click here.
Additional Options
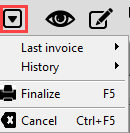
Invoice type: There are various invoice type that you can chose from depending on how your system is configured: Invoice, Order, Repair, etc. Certain types of transactions, such as Supplier orders and supplier purchases require specific access granted by your Alice POS Administrator.
Advisor: This is where the employee’s name will be displayed. It defaults to the currently logged in clerk, but you can change it by clicking on the drop down menu and selecting the employee that will be completing the transaction.
![]()
Client: This is where you add your client to your invoice. If you don’t need a client for the invoice, simply click on the lightning bolt icon to assign the quick sale client to the transaction.
![]()
Search: The search button allows you to quickly find a client.
![]()
Left panel
Both sides of your screen feature retractable panels. The left panel displays customer information.
Information tab: The information tab contains several informational fields about your customers.
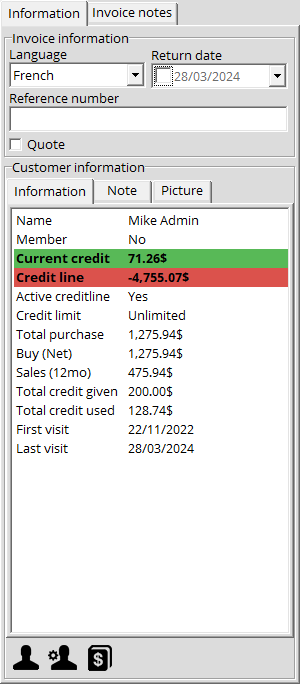
- Language: You can select your customer’s language which will be used on the invoice (English, French, Spanish)
- Return date: This field is for the Rent and Repair modules but is flexible depending on the invoice type selected. For example, it can be used to indicate deadlines requested by the clients.
- Reference number: Some customers require a reference number for an invoice, commonly known as a P.O. (Purchase Order) number.
- Quotation: Checking this box will convert your invoice into a quote. Consult this page for more information on estimates.
- Client information: The three available tabs (Information, Note and Picture) allow you to consult information about your customer linked to the current invoice. You can leave a note about your clients in the Note section.
- Go to contact button: This is a shortcut which will bring you to the contact module and display your customer’s profile. This can be useful if you need to consult your client’s information.
- Modify contact button: This will prompt the Edit Contact window allowing you to make quick edits on your client’s profile.
- Account receivables button: This will prompt the Credit Line information window which can be useful to quickly pay off what is owed on the client’s credit line.
Invoice notes tab: This tab contains text fields used to leaves notes for the current invoice.
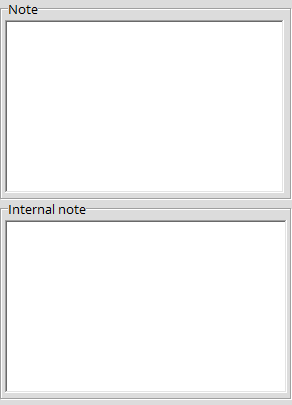
- Note text box: This field is to leave notes for the current invoice. For example, you can write in “In reference to invoice 170808-888” if an error occured on a first invoice and you created a second invoice to correct the issue. These notes will be printed out on the receipt of the current invoice only.
- Internal note text box: This field is used to leave notes that visible only to you and your employees. These notes will only apply to the current invoice.
Right panel
The right panel contains the quick pick buttons as well as the quick payment buttons.

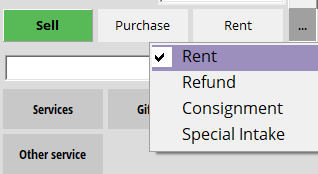
The first section of the right panel has all the invoice modes that you can use in Alice POS: Sell, Purchase, Rent, Refund, Consignment and Special Intake. To view more than the first three, click on the button with “…” and you will be able to chose the invoice mode that you need. It is possible to configure which mode is displayed by default as the 3rd button. Click on this link to learn more.
There is also a search field that allows you to manually search for items. It is also possible to scan the bar code to add the item to the invoice automatically.
![]()
To make it easier to find serialized items, search for the number that has been assigned to it that begins with letters followed by numbers. Click here if you wish to know more on how to search items.
The following section contains buttons that allow quick access to services, gift cards, Other service, kits and Cross sales.
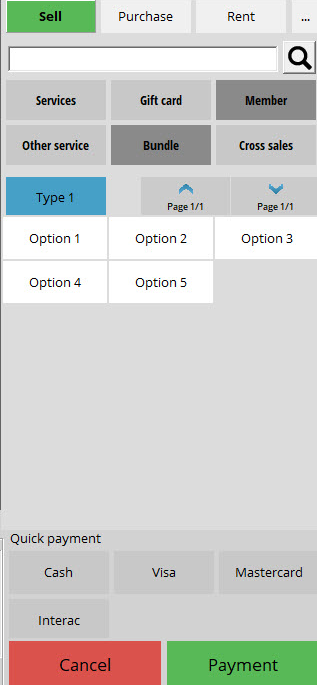
- Service button: The service button will show all of the services that you have configured in Alice POS.
- Gift card button: This button allows you to create an Alice or DataCandy gift card. For DataCandy Card, select if you wish to Activate or Recharge if the balance of the card is 0$. In the Amount field, add the amount for the gift card.
- Member button: This button is useful for those who offers a membership program.
- Other service: The Other service button allows you to sell items that are not necessarily in the inventory. For example, for a store that sells fishing equipment, a container of worms doesnt quantify itself very well in their inventory. With this button you would be able to put in “1 container of worms” and put in the sales price you wish.
- Bundle button: This button is useful for businesses who buy items from their clients. Certain clients will come into the store with a bundle of objects that they will want to sell.
- Cross sales button: This button will prompt the Cross sales window suggesting additional items for your clients or verification purposes.
Quick Pick Button Section
The following subsection has the quick selection buttons that you have previously configured. It can contain items that you sell frequently or services that you offer.
Quick Payment Button Section
In this section you will find the Quick payment buttons that you have previously configured.