
First step
As soon as you receive your POS device(s), the first thing you must do is contact the Moneris customer service line. They will assist you with the initial setup of the terminal to ensure it is ready to be connected to Alice POS, as well as provide you with the necessary information listed below. They can also help you create your Moneris account on their web portal. This is necessary, as you will find information there that we need to enter into Alice POS.
The Moneris activation team must confirm that your terminal is fully activated and ready to operate.
IMPORTANT POINTS TO CONFIRM BEFORE CONTACTING US:
- Ensure that Moneris helps you set up your account on their web portal and shows you how to navigate the site: https://www2.moneris.com/en/login
- Ensure that the device is properly connected to your network and fully configured according to the specifications listed below
- Assist you with the (admin) password to access the terminal menus so you can navigate the configuration settings
- Ask them for the device’s ECR/HSN number, which begins with 66xxxxxx
- Validate with Moneris that your account is indeed configured in "CLOUD POS" mode
*** VERY VERY IMPORTANT: Ask Moneris to make sure that the option is indeed checked in the IP Gate section of their interface."
Settings to configure on the device:
- Press the YELLOW key and the number 1 at the same time to enter the menu
- Select: NUAGE MONERIS / CLOUD MONERIS option
- Then select: PRODUCTION
- Then choose: LAN
- Select IP4 method
- Finally, select: DYNAMIC instead of STATIC
- Click “OK” to exit the configuration menu
Here is the information you will find in the email from Moneris. This must be entered in Alice POS:
-
ECR/HSN Number of the device: 66xxxxxx
-
Merchant Number: 003XXXXXXXX
(Moneris will provide you with a number like E130... — in Alice, you must replace "E1" with "00") -
API Key: ********** (The API key is provided by Moneris)
Link to the Moneris / Merchant Direct Portal:
https://www2.moneris.com/fr/login
You must log in using the email address that was used when registering your Moneris account.


If you have 2 terminals, ensure that the ECR and Pin pad numbers are correctly associated with each other.
Seconde step
Once the initial setup is complete, open Alice and go to the Configuration menu. In the Configuration menu, click on the Moneris tab.
In the Moneris tab, follow these steps:
- Check the box to activate a Moneris terminal and select the Verifone terminal.
- In the connection settings, enter the information provided in the Moneris email.
Once the information is entered, click OK to close the configuration window.

Third step
With the information entered in the Configuration menu, we can now link the terminal with Alice POS.
Go to the Tools menu and select Moneris. In this small window, you will see the options needed to link the terminal to Alice.
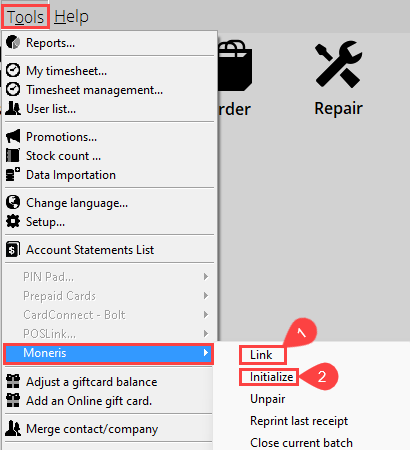
- The first step is to select the LINK option. This will open a window where you need to enter the pairing token found on the screen of your device.
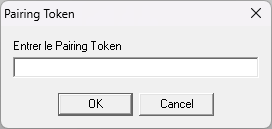
The pairing token is a 6-digit number that is always visible on the terminal screen. It will appear automatically when the POS is ready to be paired. If it does not display the pairing token, you must unpair the terminal in Alice and try again.
Once you have successfully paired the terminal with Alice, return to the menu and select the Initialize option. This operation may take a few seconds, but once completed, the terminal will be ready to use. Occasionally, this procedure may need to be done more than once, and the pairing token code will change.
If the device still does not connect, ask Moneris to remove the device from their system and add it back, then try the pairing token again.
To access the P400 menu:
Press the "Yellow" button and the "1" button simultaneously.
To access the P400 menu to view the IP configuration:
Press the "Yellow" button and the "4" button simultaneously.
USEFUL LINKS: MONERIS TECHNICAL SUPPORT / P400 USER'S GUIDE