
Getting your Alice POS system ready
Don’t wait until the last minute to prepare your categories and products prior to their online transfer. Save time and do it today!
Enabling Categories
In order to begin using your web services, you will first need to tell Alice POS which inventory categories you would like to have displayed on the site.
- Go to Tools => Setup or click the Configuration icon
- Go into the Inventory tab.
-png.png?width=438&height=765&name=setup-inventory-categories%20(2)-png.png)
- Click on the Inventory categories button.
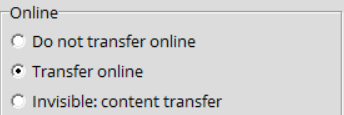
- For each category and sub-category that you would like to see displayed on your site, you will have the choice between the following 3 options:
- Do not transfer online : Does not display the category online and blocks the feature from being applicable to the products within the category.
- Transfer online : Displays the category and enables the display options to allow for viewing the products on the web.
- Invisible: content transfer : Enables the setting to send the products online but does not transfer the category on the web, meaning they are not shown online.
Enabling Products
- If you have enabled a category to make it display online, you will see within the product details that all of the products for this specific category are now available for selling online. You will have three possible options again by right-clicking on your products in your Catalog :

- Not available online : The product will not be displayed on your site.
- Available online : The product will be displayed on your site and will be available for purchase by customers.
- In-store sales only : If you have checked the Available online option, it is possible to add an extra option that blocks product sales online. The customer wanting to buy the product will then need to get to the physical store in order to purchase it.
Tips : It is possible to select multiple products at once by holding down the Shift key while clicking on a product. To check if the product is online, make sure there is an "O" in the "O" column (Online) on the left.
Configuration for Online Orders
To ensure that orders made online are properly connected to your Alice POS system, there are a few settings that you will need to configure.
- Go to Tools => Setup or click the Configuration icon
- Go to the Web site tab.
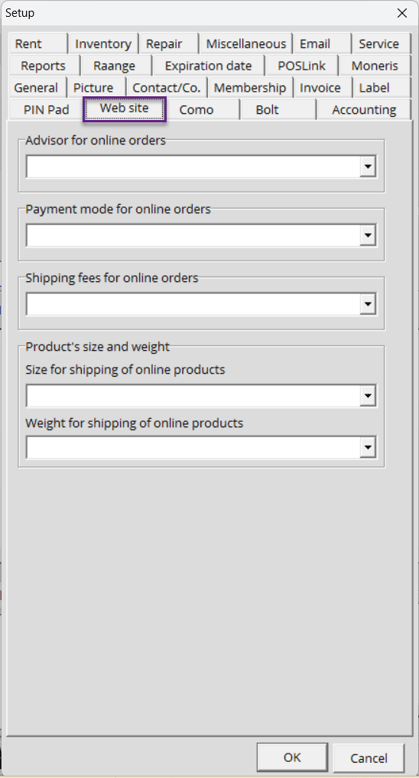
- The three following options must be filled out for online orders to function.
- Advisor for online orders : The name of the employee or advisor that will be associated to the order. It is possible to create a user specifically for online orders.
- Payment mode for online orders : The payment method that will be associated with online orders. It is possible to create a payment method specifically for online orders.
- Shipping fees for online orders: The service that will provide the shipping fees for the online order.

Product Details
The following information about an item will be displayed on your website.


- Inventory category: You must ensure that your product has been added to the correct category.
- Name of item: The name of the product that will be displayed online.
- CAD: The purchase and sales price for new and used items.
- Type of product: We have three types of products available in Alice POS. For better tracking of your inventory, we recommend using the Serialized type if your inventory contains multiple copies of the same product, but have different prices. However, if your products are in quantity, you can still sell them in your shop.
- Release date: The release date can be used to announce an upcoming product.
- UPC: Don’t forget to input the UPC code of the product.
- Product attributes: Use the product attributes to provide information to customers about specific product features. For example, you can use the product attributes to define the size of the box to ship the product in.
- Description and note: You must fill in the Description field to give details on your product.
- Image: Don’t forget to link a picture to your product so that it may show on your website. The pictures have to be in .jpg format with an approximate size between 72 and 100kb.
If your website is linked with an Alice POS Master database, you need to make that all of the information above has been added in the Master.
If you need more help on product creation in Alice, feel free to consult the following article.