With the implementation of the matrix feature in Alice, we have also implemented a tool that can allow you to convert existing items in your catalog in to matrix items.
NOTE: Ensure to read the full article before attempting to use the converter tool as accidental conversions cannot be undone and items accidentally converted to matrix items must be deleted and remade.
Matrix Converter Tool Interface
The following is the main window for the Matrix Converter tool with a brief explanation for what each section is used for.
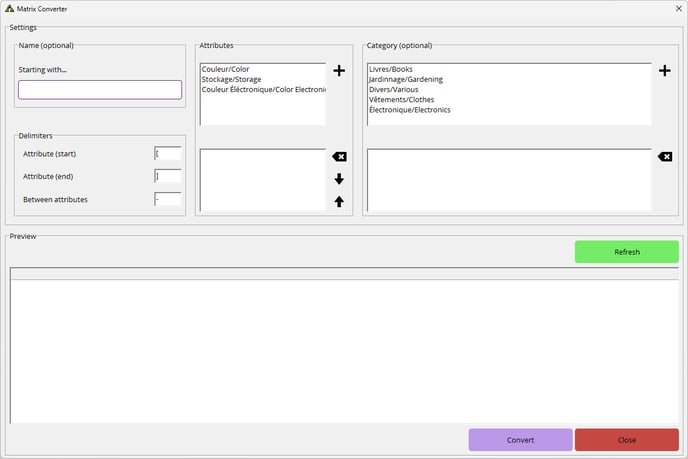
- Name (optional): Here you can enter in a product name to help narrow down the search for products that you may wish to convert to a matrix product.
NOTE: Leaving this empty will cause the preview section to show all items that could have a matrix applied - Attributes: This section allows you to chose the attributes that apply to the items you are trying to convert. These are required so that the convert tool can properly assign the format to the new converted items.
- Category (optional): With this section you can select the category that you wish to restrict the search to when searching for the items in question that you wish to convert to a matrix.
NOTE: If you don't select a category to restrict the search and you have multiple items with the same base name across several categories. The convert tool may see them as one item and offer the chance to link them all together. - Delimiters: In this section you can set the delimiters that denote where the product name ends and the attributes begin in the existing product names. For example, with the product Blue Shirt (M), brackets would denote the beginning of the attribute part of the product name.
- Preview: This section shows you all the matches that meet the criteria of the setting you have set, Name, Category, Attributes, and Delimiters.
How to use the Matrix Converter Tool
With the help of an example, the following section will show how to go about using the Matrix Converter tool
NOTE: Ensure that all steps are properly followed as items that are converted with the tool cannot be separated and must be deleted and recreated.
- Open the Matrix Converter tool by going to Tools -> Matrix Converter

- Once the window is open, put in the name of the item.
- Next select the attribute that will apply to the matrix. You can double click on the desired attribute or select it and click on the + button beside the field.
- Next, select the category where the items you wish to convert are found. To add it select the desired category and press the + button.
NOTE: If a category has sub categories, double clicking on the parent category will open up the next level of categories. Should you wish to go back up a level you will need to double click on the .. entry to go back up a level.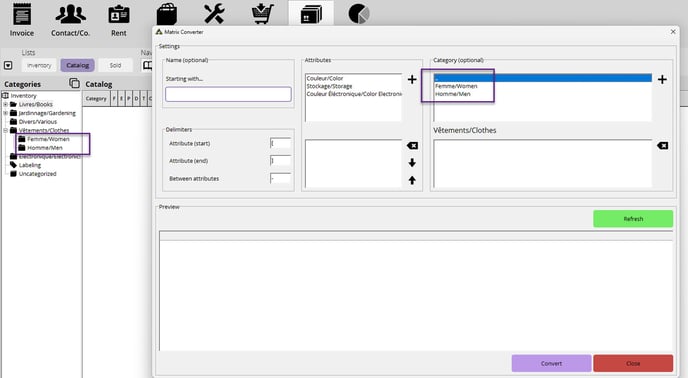
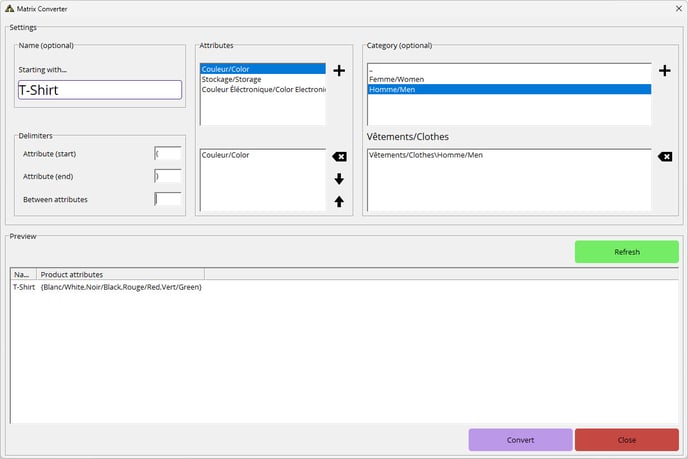
- Next, enter in what the delimiters are to show where the attributes in the name begin. In the following example image, the delimiters are brackets ().
NOTE: The Between attributes option is used to separate if there are multiple attributes in the name. - Now click on the green Refresh button to load up a list of the item or items that fix the criteria that you entered. In the example image shown, Green Camo Shirt will be the base parent item with the 4 different sizes becoming the children\variations. Verify that the item has all the proper attributes assigned to it, select it and click on the Convert button to switch the selected item into a matrix item.
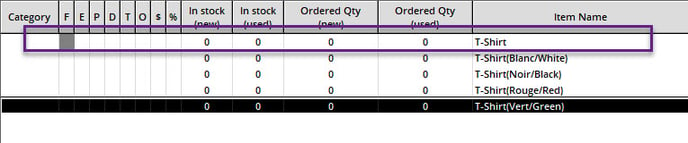
Once the convert button has been clicked a new parent item will be created linking all of the existing items together and items properly converted should give the following outcome. The item highlighted in the following image is the newly created parent while the other 4 items are the original items present from the catalog.