
How to create a new user or employee
Before creating a new user or employee they first must be created as a contact.
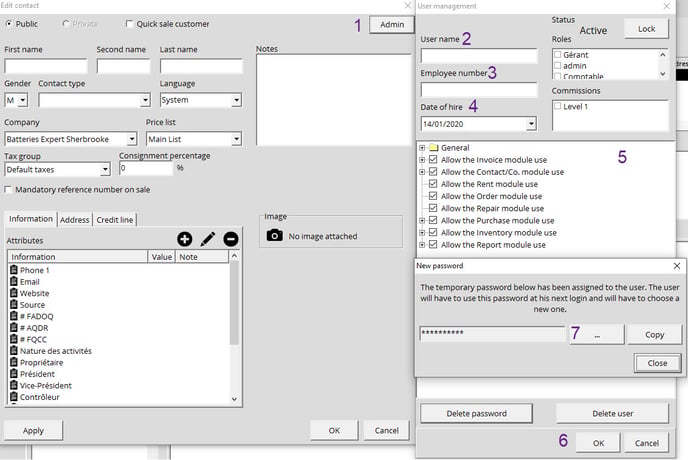
- Find the contact that you set to become a user or employee and double click on it.
- Click on the Admin button in the top right corner.
- Type in the username that the employee will use to login. Please note that the username is case sensitive.
- You can also add their employee number and hire date.
- Once you have finished selecting the accesses or the role of the employee, click OK.
- This will prompt a new window which will give you a temporary password for your employee or user.
- You can display the password by pressing the ... button so you can write down the employee password or copy it to give it to them on the spot.
Warning! Ensure to assign a username to your user, leaving it blank could negatively affect your system.
How to Find a User in Alice
Go to the Contact module, select Contact and enter the user's name in the search bar. Now select the profile of the user you are looking for. 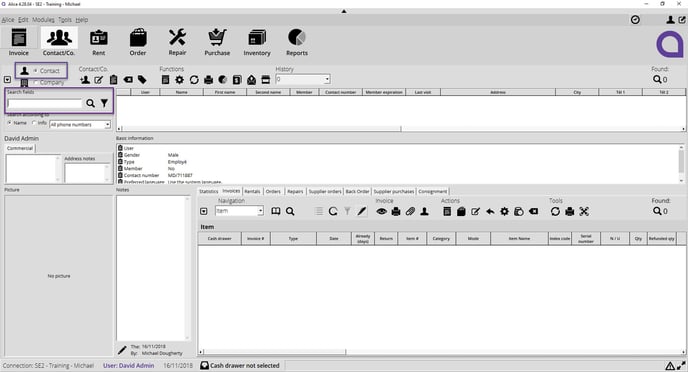
OR
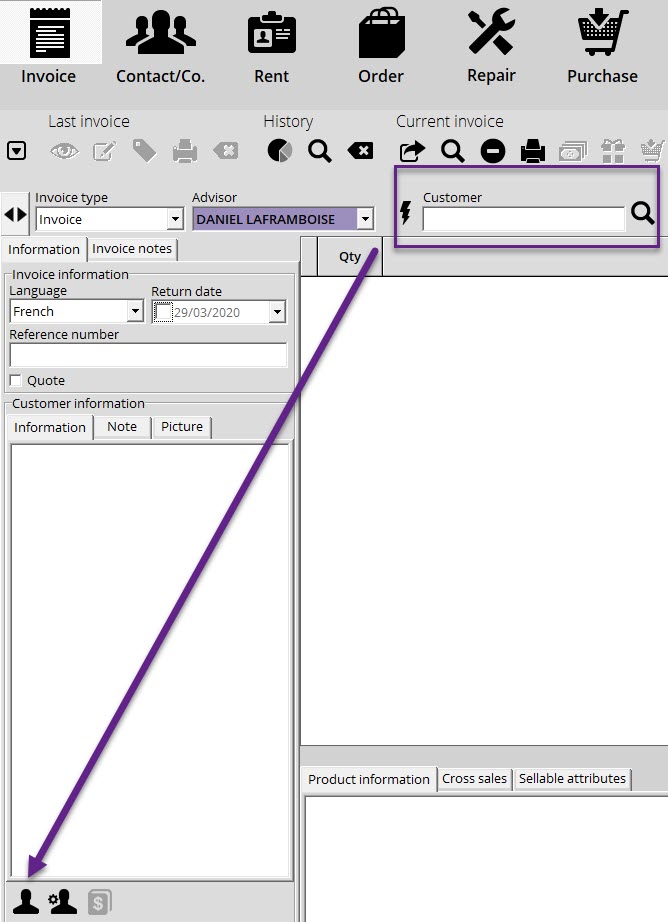
In the Invoice module, find your employee in the customer search window. Once selected click on the icon « Go to contact » to go to the users profile in the bottom left corner.
OR
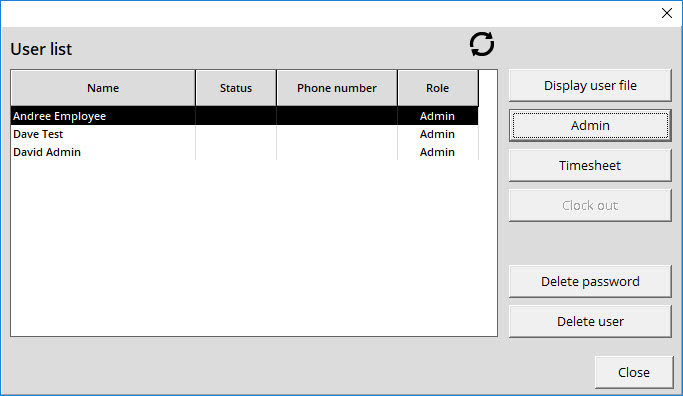
You can also access a list of users by going to the Tools menu at the top and selecting the User list. This list can also act as a shortcut for certain tasks that the system administrator may have to deal with,
such as managing timesheets or deleting a user password.
How to Delete a User

- Search for your employee or user in the Contact/Co. module.
- Click on the Admin button.
- Click the Delete User button at the bottom.
- Confirm that you want to delete the user.
- The contact will remain in the system should you wish to consult it or reuse it but they will no longer have access to Alice POS.
Administrating Your Users
Here's how Alice POS administrators can manage their employee accesses:
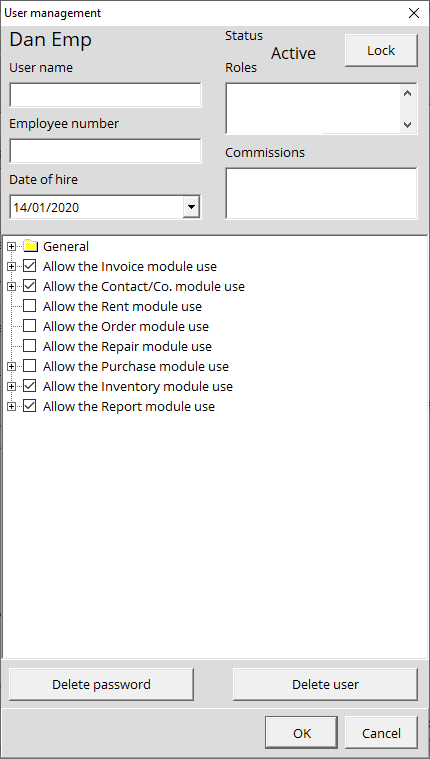
- Username: This is the username that your employee will use to log in.
- Status: This shows you the current status of the user account; whether if the account is active or blocked.
- Employee number: You can assign them an employee number.
- Hire date: You can specify the date of hire.
- Roles: You can assign a preset role to your employee.
- Commissions: You can assign a preset commission level to your employee.
Roles
This is where you can assign accesses and roles to your employees. You can select accesses à la carte or assign them a preset role.
- First, you must configure the role types that you wish to assign to your employees.
- Select which role to give to your employee. Remember: the more access they have, the greater the responsibility they will have.
Here's a description of the options available:
General
- Allow system management: This option allows the user to become an Alice POS Administrator. Due to access to view sensitive information, we suggest that you grant this access to only a few employees.
- Deactivate the automatic login for the session: This option removes the login prompt after Alice has been inactive for a set amount of time. This is dependant on the automatic login option being enabled.
- Deactivate the punch option for the user: This option removes the clock in/clock out option for the employee.
- Display cost and profits: You can opt to hide the cost and profit of your inventory for confidentiality purposes. This will be applicable to the inventory module along with all applicable reports.
- Allow user to modify his/her timesheet: You can give users the right to modify their timesheet. This option was created in case the employee needs to modify their timesheet due to an unexpected problem.
Allow the Invoice module use
- Modify taxes in an invoice: Your users will be able to edit taxes while creating an invoice.
- Refund a deposit: This will allow your employees to refund deposits.
- Cancel a previous invoice: This will allow your users to cancel a past invoice.
- Deactivate the membership: This option removes the prompt to offer a Membership to non-member clients when using the Invoice module.
- Deactivate the cross-sales window: This option removes the prompt displaying available items available for cross-sales when making a sale.
- Open the cash drawer on demand: This lets your employees open the cash register when needed.
- Make inter-store transfers: This allows the user to makes inter-store transfers. Please note that this requires at least another store in your Alice network.
- Make supplier purchases: This allows the employee to do supplier purchases.
- Allow add quick inventory: This allows users to quickly add inventory when making a sale.
- Make supplier orders: Allows the user to make supplier orders.
- Export the invoice list: Allows the user to export the invoice list.
- Display the gross margin: When viewing invoices by item, the user will be able to see an additional Gross profit column.
- Visualize the totals: The user will be able to see the totals in the invoice list.
- Visualize prior invoices: This will allow the employee to view past invoices.
- Disallow invoice canellation and modification: The user for whom you activate this right will not be able to modify or cancel an invoice.
- Allow editing in shop mode: Allows you to modify a Repair transaction in the Invoice module and then save the changes made without having to go through the Payment window.
- Allow sales without inventory: Allows the user to sell a product that has not been in inventory.
- Current invoice:
- Allow sell price modifiation in the invoice: By checking this function, you authorize the user to make modifications to the selling prices of the items on the invoice.
- Allow buy price modification in the invoice: By checking this function, you authorize the user to make modifications to the purchase price of the items on the invoice.
- Allow discount modification in the invoice: By checking this function, you authorize the user to make modifications to the discount of the invoice items.
Allow Contact/Co. module use
- Export the Contact/Co. list: Allows the user to export the list of contacts and companies for consultation purposes.
- Delete entities: This option allows the user to delete contacts or companies.
- Adjust credit: This option allows the user to adjust store credit for clients or companies.
- Allow the contact and company type configuration: This option allows the user to create or modify contact and company types.
- Edit Contact/Company's Price List: Allows employees to assign a price list to contacts and companies.
- Allow to reset password: This option allows you to change the temporary password given by Alice when creating a user or when changing a password.
Allow Rent module use
This option allows the user to access the Rent module.
Allow Order module use
This option allows the user to access the Order module.
Allow Repair module use
This option allows the user to access the Repair module.
Allow Purchase module use
This option allows the user to access the Purchase module.
- Add/modify products: Allows the user to add purchases and to modify them.
- View lowest purchase price: Allows the user to see the best price given by the supplier.
- Modify the product status: Allows the user to modify the status of the products listed in the purchase list.
- Export the purchase list: Allows the user to export the list of completed purchases.
Allow the Inventory module use
This option allows the user to access the inventory module.
Catalog
- Add products: Allows the user to add new items to the catalog
- Modify the prices: Allows the user to modify the price of items listed in the catalog.
- Modify the UPC codes: Allows the user to modify the UPC codes assigned to items in the catalog.
- Modify the release dates: Allows the user to modify the release date for items in the catalog.
- Delete a product: Allows the user to delete items from the catalog list.
- Assign an index code to a category: Allows the user to assign index codes and serial numbers to a product (if need be).
Inventory
- Modify the inventory purchase prices: Allows the user to change the purchase price of an item when they are in the Inventory module.
- Modify the inventory sales prices: Allows the user to change the selling price of an item when they are in the Inventory module.
- Export inventory: Allows the user to export the inventory list.
- Allow stock count: Allows the user to access the stock count function.
- Allow inventory deletion: Allows the user to delete items from the inventory module.
- Allow modification of the RMA module: Allows users to add/remove RMA status on items.
Allow the Report module use
Enabling this function will allow the employee to generate the following reports:
- Sales reports
- Membership reports
- Accounting reports
- Employee reports
- Contact reports
- Inventory reports
- Pricing reports
If you don't want to assign a specific role to your employee, you can simply select the options that would work best.